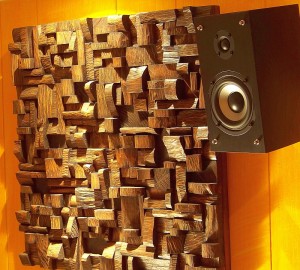
 When looking at the 8 qualities that define an awesome recording space, there are two in particular that interest us:
Textured walls, and a lack of parallel walls. Notice that with each one, sound scatters randomly throughout the room, and the natural frequency balance of an instrument is preserved.
This concept is commonly known as diffusion. And it’s a necessary ingredient for good recording studio acoustics.
So what happens when your room is lacking the natural diffusion of an old brick building? What then?
Fortunately there are tools that can create diffusion artificially. They’re known of course, as diffusers.
Contents
How Diffusers Complement Acoustic Foam
Why on earth would you want to disperse sound reflections with a diffuser when you’re already trying to absorb them with acoustic foam?
It’s a fair question. The answer is…too much of either is a bad thing.
What we’re really aiming for is a balance. Just enough absorption to remove excess reflections, but not so much that the room sounds like an anechoic chamber. After that, the diffusors take over to disperse whatever reflections remain.
It’s kinda like the 3 bears: not too hot, not too cold, but just right.
3 Acoustic Diffusors to Add to Your Room
Here are 3 examples of diffuser to add to your studio:
- Auralex Studiofoam T’Fusor Sound Diffuser
- Auralex Sustain Bamboo Waveprism Diffuser
- Auralex Sustain Bamboo Peak Pyramid Diffuser
3 Simple Rules for Positioning Your Diffusers
Once you’ve purchased some diffusers, the next step is mounting them. Here’s how you do it:
1. Mount diffusers on the back wall of the control room
The front wall of your control room, (behind the studio monitors), should be mainly focused on absorption.
The back wall should be mainly focused on diffusion. The back wall of the control room will be bombarded with a large majority of the direct sound, so you want to make sure that those first early reflections will scatter as randomly and evenly as possible.
2. Mount diffusers on the ceiling
The standard place to mount your diffusers is on the ceiling.
For some reason, reflections seem to sound better coming from floor as opposed to the walls. So we use reflective flooring. The problem is that frequencies can still get trapped between the floor and the ceiling. With some well placed diffusers on the ceiling, those reflections will scatter nice and evenly.
When you mount them on the ceiling, make sure to be careful. You don’t want them to fall and land on your gear – or worse – someone’s head. If you aren’t skilled with a hammer, find someone who is.
3. Mount diffusers on the upper half of the wall
If you are lucky enough to have a larger room with high ceilings, you may want to add a couple diffusers on the upper half your studio walls. As a general rule, any wall surface above head level can benefit well from a bit of diffusion. Anything under that should be mostly absorption.
